Threadgrafting _modifications of standard technique ( part 1 )
MODIFICATIONS?? Why do I need that?
Well, there are at least a few more or less good reasons.
-
Genetic predispositions of some plants that could disqualify the threadgrafting techniques ( majority of needle trees, evergreen plants, plants with large buds - ie linden or leaf opposed buds.
-
Timing. Too busy in the spring or just made a decision on a restyling later in the year
-
Tight fit. A hole with a diameter equal to the diameter of the branch? OK, how about the buds?
-
Speed. You can obtain two new branches/roots with a single threadgraft. Or even new roots and new branches
PREDISPOSITION
As with the standard threadgrafting method you should
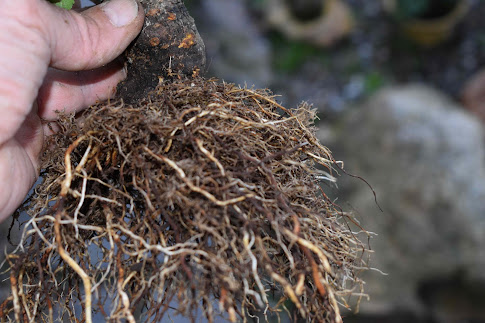
- plan the threadgraft at least one year ahead to grow a suitable branch or to get the right VIGOROUS seedling for a root graft
- NOT be too much concerned about the right season to start - the most important factor to the success is the vigorous growth of the grafted shoot.
- NOT be concerned to leave the tree with the threadgraft in progress outside over the winter.
- select the right diameter of the threadgrafted branch. A thick branch + vigorous growth could end up with too thick new branch in comparison with the receiving trunk or branch.
- make you grafting tools RAZOR SHARP. Just try to shave your forearms with your grafting knives
- position the first bud ( or the fork on grafted root ) in a right direction and in a reasonable distance from the main trunk to keep the internode short.
- use small wedges to fix the branch in both entry and exits points
- wire the threadgrafted branch and point it up. Let the branch grow freely for the whole season. You may redirect the flow of sap to this branch by reasonable pruning the other ones
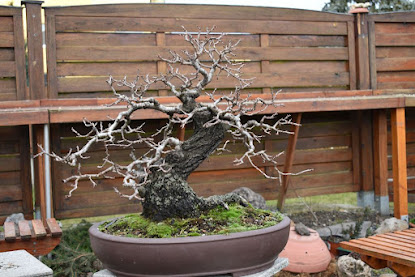
- BE PATIENT it can take anything between one or two years to achieve a good connection. So do not rush it up. The general practice to follow: The threadgraft started in spring could be separated at the end of spring next year. But follow your common sense. In case of a doubt just leave it there. I have a threadgraft on a birch for three full seasons - some branches have a good growth in the length but limited thickening - see the pics below.
- GET the good connection. There should be a visible thickening NOT only on the exit but also on the ENTRY side of the threadgraft ( see the pic below )
- disconnect the feeding side of the threadgrafted branch in gradual steps. Also, I keep a small stub there for some time to let it dry. After that it is leveled with the rest of the tree and covered with a sealer. In fact, I follow the same practise used while pruning birches
- keep your fingers crossed. It doesn't help but it is good for your morale
 |
| AUTUMN 2015. After two seasons the "fusion" still doesn't look good |
 |
| Autumn 2016. Looks OK now. But with the winter knocking on the door I will start the separation only next spring |
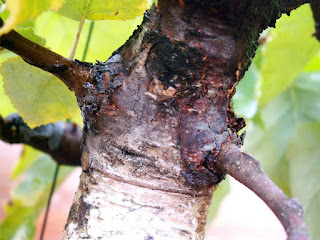 |
| Thickening at the entry and the exit points |
 |
| A small stub left at the entry side after the separation |
TECHNIQUES
- Tubing
- Tubing with leaves or after defoliation
- Plastic wraps
- OPEN Threadgraft
- Two branches, roots with a single threadgraft
TUBING ( first spot on the AusBonsai Forum )
The plastic shrink tubes are available in several dimensions at the majority of the DIY in here. Most suitable for trees with large buds either due to their genetics ( ie Tilia..) or just because they have swollen too much. So this clearly extends the "open" period suitable for the threadgrafting technique. You can still extend this period using a threadgraft with defoliated branch or even a branch with leaves - see next paragraph.
 |
| Carpinus betulus_ the start in spring 2016 |
 |
| Carpinus b_ October 2016 |
 |
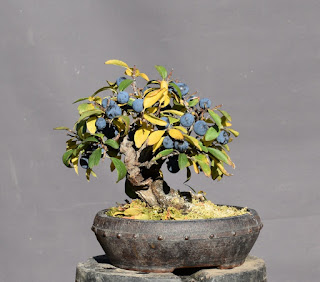
| Prunus mahaleb_ started in spring 2016. An entry via dead wood |
Please note: On the mahaleb above, I have used as an entry point the deadwood. In my experience this is not the best practice. The entry point is better to have on a live part of the tree.
TUBING_Defoliated branch_a branch with leaves
I have also tried to make a threadgraft with a branch with some leaves on it or a branch after defoliation. For the defoliated branch I have used the standard tube while for the branch with leaves I have cut the tube lengthwise. In that case I have used a wire to close the slit. The wire has been fixed to the branch starting few centimeters before the tube to get an anchor point then crossed the tube and ended about 10 cm after the tube so it could be used as a handle to pull the branch through the hole. For me this is a blind alley. To much time consuming and at the end the leaves are often so damaged that you need to defoliate them anyway...
The threadgraft of a defoliated branch is much easier/safer to do so for me this is a better option. At the beginning I was a bit concerned about doing two treatments on a single branch ie a defoliation and a threadgraft at one time. But as you can see on the third pic below it seems it could work. The magic seems to be in the vigorous growth.
 |
| Carpinus betulus_a threadgraft_ a branch with leaves |
 |
| As above now with passage completed with the help of the "pull" wire |
 |
| Tilia cordata. A threadgraf using a defoliated branch _started at the end of May 2016 |
PLASTIC WRAPS
A technique similar to the tubing. The branch is wrapped with a shrink foil and a thin wire is used to enable a clean and safe passage through the hole. In comparison with the tubing it takes more time, but as the foil is easy to find at home it is still a viable option.
The rest will be covered by the end of this week.


Comments
Post a Comment