Posts

Wood plates_Some of the finished ones

Image
BURLS Birch Ash More details in the OFFER page

Ji-ita. Ready to be used.

Image
I have left the wood plates at the time when they were resting to get rid of the major part of its natural moisture.   ( the first part  here  ) Once the process is completed you can enter the stage of a real craft. Sanding Down from grit 80/100 to 220.  No jumps over the individual grit sizes to avoid scratches. Carving the groove Few blisters is the lesser cost of this work.   The chisels can do much more harm if they enter any soft tissue... Carving the edges... ...to get rid of some excess material and/or to fine tune parts of the outer sides... Staining or painting Once you have finished the carving of the edges you can paint them.  Also you can stain or paint the surface to enhance the structure of the wood. OK, that is for the craft part.  Now we need to change the hat to become a chemist. Penetration First of all I must highlight the fact that this part can get extremely nasty if  safety rules are not followed.    An acrylic resin is the mag

Roots over rock_a season from the start

Image
I am moving more and more from Homo sociologicus  to Homo collecticus. Yamadori  to start with. But in recent months I have enlarged the radius of my objects of interests to pieces of deadwood and stones.   Sometimes quite heavy load for my back to carry. Addiction of any sort is dangerous... Having a lot of nice rocks it has not taken too much time to get to the point where I have started thinking about connecting the rocks with the wood.  Live wood in this case. Root Over Rock.  Or ROR  if you like. As it is with any other new project you need A QUICK WIN.   Something that gives you confidence and boosts your determination to scramble up on a higher level.  A Berberis thunbergii atropurpurea looks OK for this purpose. Autumn 2017. How we did get there.... Shopping list Spring 2017:     Seedling with a reasonable lengthy roots,  a piece of rock, sphagnum moss, plastic tape and shade cloth. Summer 2017 Autumn 2017 Roots before combing with

Boxwood_Buxus sempervirens_Eight years of life in a pot

Image
In the early 90' we have bought some boxwood  to plant a hedge in our front garden.   Some of the surplus shrubs have been planted in the backyard in case they will be needed later on.   At the time I have started with bonsai I have been searching the yard for any possible candidate and one or the boxwood has attracted my attention. Reversed taper and  problematic straight branches were  not a problem for my heart under fire and eager hands... Clearly,  the brain had nothing to say at that time. 2013 The reversed taper is not a big problem now.  The branch with accute angle attracts too much attention 2015 A lot of space for birds to fly through the crown... Nevertheless the foliage has covered the problematic branch. Getting the shape. 2017 I guess we are +/- there.  It needs a bit of pruning to fine tune the pads,  but this will wait till the spring. Height: 45 cm

First yew. Bending thick branch using hot water. Result.

Image
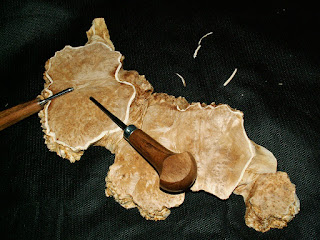
So, back to the yew and the bending of the remains of the original trunk.   In summary,  I have tested two methods of bending thick branches_dead wood.   1.  Method cut and close  2.  Hot water to soften the wood to make it less resistant to bending (see the previous article for details ) After the bending and bit of carving Top jin_before the bending After. Detail As a hobby joiner I have always thought about bending thick branches using heat as this is very old technique used in joinery for centuries.   Well, I should rather say using hot steam than just heat.   In practice, I have simplified the thing even further and instead of using the hot steam I have used a boiling water.  After this treatment I felt that the wood is "softer" and I was able to bend it.   Definitely much less than I have hoped, though.    I think that the hot steam would work much better nevertheless I would need quite different set up for this.   Taking into acc

My first yew

Image
Forget about YAMADORI when it comes to yews. There are not many yews in the wildness here in Czechia.   And to protect the remaining ones they have the status of highly protected trees by law.  So forget to collect it from the woodland.   The only  way is to collect from garden center/nursery or from your neighbor's garden once they are on a holiday... My biggest yew is located in the front garden - I started to build a niwaki tree a few years ago and by now it starts to look presentable.  The other two are in the mid-sized category with the target height around 50-70 cm.  We will see. The smaller one of this two has made a quite nice progress this year.  So I thought it would be  the right time to start some fine tuning to improve the overall appearance of the tree before the next season. Spring 2017 Summer 2017 It is a shame that I do not recall what type of fertilizer I have used on this tree.  From next to nothing it has moved to this: Possible front

ROR_Sort off

Image
I do admire people that could pinpoint  the best feature/s on their trees  and "build" the trees around it.  It is by far not that easy for me.   It may come on some trees but on some others ... It is a pain really.  It is exactly this sort of pain on this little Mahaleb.   I have written quite a lot about this pain in one of the earlier article (  here  ) so no need to remind myself of this pain in this new one... 2016 2017 After quite a long time of staring on the photographs of this tree I could not think of anything better than just to add side roots to the main one that crosses the rock.  I have used the same technique  as I do on other trees - removing few bits of the bark, apply rooting hormone ( I do not think it is necessary as this is a root anyway full of respective hormones ), covering the whole thing by sphagnum moss and keeping it wet.  The last point - keeping it wet - proved to be the most challenging ).  And a bird/wind protection over